Checkbox Detection: OpenCV vs YOLO
Introduction
Checkbox detection in scanned documents is a common task in document processing pipelines. Whether you're automating form processing, digitizing surveys, or extracting data from legacy paperwork, reliably detecting and classifying checkboxes (filled vs. unfilled) is essential.
In this post, I'll walk through two approaches I implemented to solve this problem:
- Traditional Computer Vision with OpenCV - Using contour detection and heuristics
- Deep Learning with YOLOv11 - Training an object detection model
Both approaches have their merits, and the best choice depends on your specific constraints. Let's dive in.
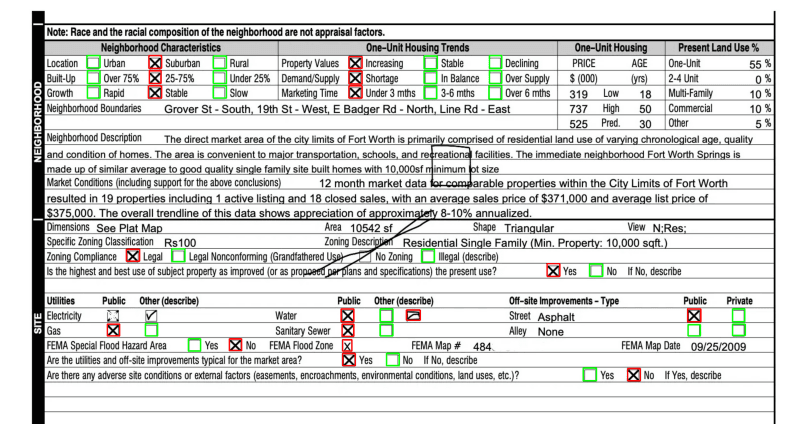
 A scanned form with multiple checkboxes to detect
Approach 1: OpenCV (Traditional Computer Vision)
The OpenCV approach uses classical image processing techniques to identify checkbox-like shapes through a pipeline of preprocessing, detection, and classification. Nowadays many people would just jump straight to ML based techniques, yet traditional CV techniques are very powerful, debuggable and fast; and should not be overlooked.
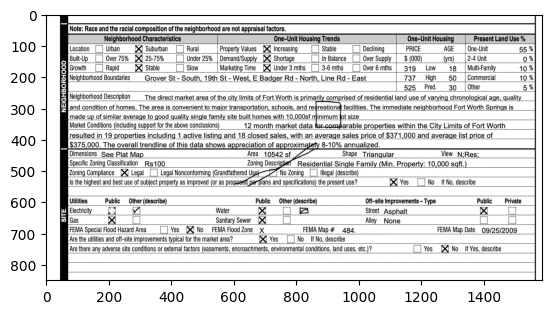
I tried different approaches and arrived at the following pipeline, which I will exemplify with this image:
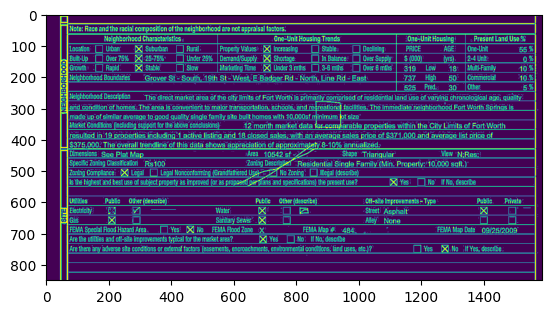
Step 1: Preprocessing
The first step converts the image to a binary mask using adaptive thresholding:
def preprocess_image(image_path: str) -> np.ndarray:
    image = cv2.imread(image_path, cv2.IMREAD_GRAYSCALE)

    # Adaptive thresholding handles varying lighting conditions
    adaptive_thresh = cv2.adaptiveThreshold(
        image,
        maxValue=255,
        adaptiveMethod=cv2.ADAPTIVE_THRESH_GAUSSIAN_C,
        thresholdType=cv2.THRESH_BINARY_INV,
        blockSize=11,
        C=2
    )
return adaptive_threshAdaptive thresholding calculates a local threshold for each pixel based on its neighborhood, making it robust to uneven lighting in scanned documents.
Step 2: Contour Detection
Once we have a binary image, we find contours (continuous boundaries) using OpenCV:
contours, _ = cv2.findContours(processed_image, cv2.RETR_TREE, cv2.CHAIN_APPROX_SIMPLE)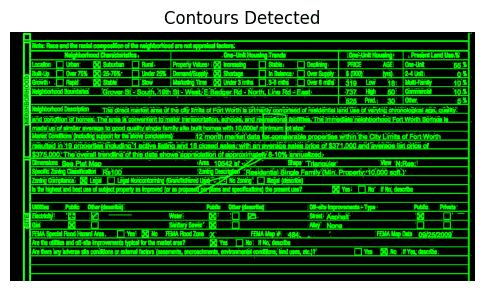
Step 3: Filtering Checkbox Candidates
Not every contour is a checkbox. We apply several filters:
- Aspect ratio: Checkboxes are square-ish (aspect ratio ≈ 1)
- Convex hull alignment: The convex hull area should be close to the bounding box area
- Outlier removal: Filter boxes whose area deviates significantly from the mean
# Check if the contour is square-ish
aspect_ratio = float(w) / h
if 0.8 < aspect_ratio < 1.2:
    hull = cv2.convexHull(contour)
    hull_area = cv2.contourArea(hull)
    rect_area = w * h

    # Convex hull should match bounding box for rectangles
    if np.abs(hull_area - rect_area) < 0.15 * rect_area:
checkboxes.append(bbox)Step 4: Classification (Filled vs Unfilled)
To classify whether a checkbox is filled, we simply compute the mean pixel intensity inside each detected box:
def classify_checkboxes(image, checkboxes):
    for (x, y, w, h) in checkboxes:
        roi = image[y:y+h, x:x+w]
        mean_intensity = cv2.mean(roi)[0]

        if mean_intensity < 85:  # Dark = unfilled
            unfilled_checkboxes.append(bbox)
        else:  # Bright = filled (has marks)
filled_checkboxes.append(bbox)Results
 OpenCV detection results: Green = unfilled, Red = filled
Pros:
- No training data required
- Fast inference
- Interpretable decisions
Cons:
- Requires extensive manual parameter tuning: Every threshold, filter parameter, and heuristic must be carefully adjusted for each document template. The
blockSize=11,C=2, aspect ratio thresholds (0.8 < aspect_ratio < 1.2), convex hull tolerance (0.15 * rect_area), and intensity threshold (85) all need manual calibration. - Poor generalization: When document layouts change, fonts differ, or scanning conditions vary, the entire pipeline often breaks and requires re-tuning. A solution that works for one form template may completely fail on another.
- Fails on edge cases: Checkboxes near text, partially occluded boxes, or boxes with unusual styling often get missed or misclassified.
Approach 2: YOLOv11 (Deep Learning)
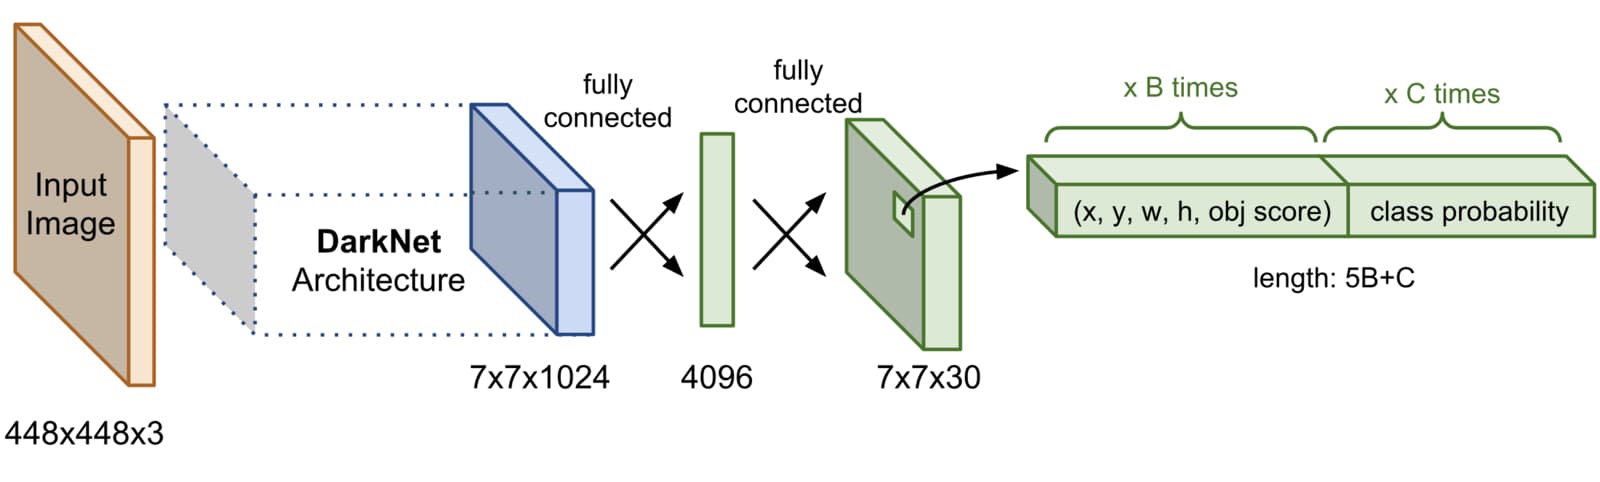
The deep learning approach treats checkbox detection as an object detection problem, using YOLOv11, the latest iteration in the YOLO (You Only Look Once) family.
For a comprehensive overview of object detection architectures including YOLO, see my post on Object Detection Architectures.
Why YOLOv11?
I chose YOLOv11 from Ultralytics for several reasons:
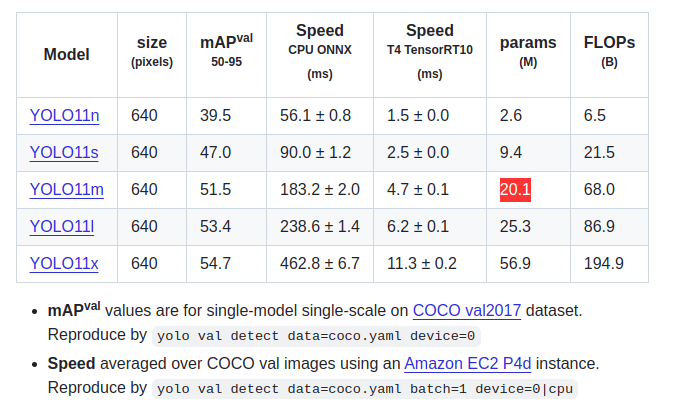
- Latest architecture: YOLOv11 builds on the success of YOLOv8 with improved accuracy and efficiency. According to the Ultralytics documentation, it offers better performance across all model sizes (nano, small, medium, large, extra-large).
- Easy to use: The Ultralytics Python API is remarkably simple—training a custom detector requires just a few lines of code. No need to dive into low-level implementation details.
- Transfer learning: Pretrained weights on COCO dataset provide a strong starting point. The model already understands object detection; we just need to fine-tune it for checkboxes.
- Fast inference: Real-time performance on modern GPUs (~12ms per image)
- Multiple model sizes: Choose from
yolo11n.pt(nano) toyolo11x.pt(extra-large) depending on your speed/accuracy tradeoff. I usedyolo11m.pt(medium) for a good balance.
The key advantage: no manual parameter tuning. Instead of tweaking thresholds and heuristics, you provide labeled examples and let the training process learn the optimal feature representations.
Training Data
One of the most remarkable aspects of this approach is how little data it requires. I annotated just 5 documents similar to the test image, with bounding boxes for two classes:
empty_checkboxfilled_checkbox
This minimal dataset demonstrates the power of transfer learning: the pretrained YOLOv11 model already knows how to detect objects; we're just teaching it to recognize checkboxes specifically. With more diverse training data (different document layouts, fonts, scanning conditions), the model would perform even better, but even with 5 images, we achieve impressive results.
Training
Training is remarkably simple with Ultralytics:
from ultralytics import YOLO

model = YOLO("yolo11m.pt")  # Load pretrained model

results = model.train(
    data="data.yaml",
    epochs=100,
    imgsz=640,
    device=[0, 1, 2, 3],  # Multi-GPU
    conf=0.5
)The data.yaml file defines the dataset structure:
path: .
train: checkboxes/train/images
val: checkboxes/val/images

names:
    0: empty_checkbox
1: filled_checkboxTraining Results
 Training curves showing rapid convergence
The model quickly learned to fit the training data, and the validation loss closely tracked training loss—indicating good generalization despite the tiny dataset. This is a testament to both the power of transfer learning and YOLOv11's architecture: we didn't need to worry about low-level primitives like threshold values or geometric heuristics. We simply provided labeled samples and let the training process do its magic.
Inference Results
 YOLO predictions on an unseen test image
With a confidence threshold of 0.5, the model detected:
- 24 empty checkboxes
- 17 filled checkboxes
Inference is blazing fast: ~12ms per image on a GTX 1080 Ti.
Pros:
- Excellent generalization: Handles variations in layout, fonts, scanning conditions, and document styles without retuning
- No manual parameter tuning: Provide labeled data and train—no threshold tweaking or heuristic engineering required
- Robust to edge cases: Handles checkboxes near text, unusual styling, and partial occlusions better than rule-based approaches
- Joint detection + classification: Single model performs both tasks end-to-end
- Data-efficient: Achieves good results with minimal training data thanks to transfer learning
Cons:
- Requires labeled training data
- Needs GPU for training
- Black-box decisions
Comparison
| Aspect | OpenCV | YOLOv11 |
|---|---|---|
| Training data required | None | Yes (but small) |
| Generalization | Poor | Good |
| Inference speed | Fast | Fast |
| Parameter tuning | Extensive | Minimal |
| Interpretability | High | Low |
| Edge case handling | Poor | Better |
| Hardware requirements | CPU only | GPU for training |
Conclusions
Both approaches successfully detected checkboxes in scanned documents, but with dramatically different development experiences.
The OpenCV approach works well for standardized forms but comes with significant maintenance overhead: every new document template requires extensive parameter tuning. The threshold values, filter parameters, and geometric heuristics must be carefully calibrated, and the solution often breaks when layouts change or scanning conditions vary.
The YOLOv11 approach, despite being trained on just 5 images, generalized remarkably well and handled edge cases more gracefully. More importantly, it requires no manual parameter tuning—you provide labeled examples and let the model learn. With more training data, the model would only improve further, but even this minimal dataset demonstrates the power of modern deep learning for computer vision tasks.
For production systems processing diverse document types, I'd strongly recommend the deep learning approach. The upfront cost of annotating a small training set (even just 5-10 images) pays dividends in robustness, maintainability, and generalization. You spend your time labeling data rather than tweaking thresholds and debugging why your heuristics fail on a new document template.
Future Improvements
If building this for production, I would:
- Expand the training set with more diverse documents
- Normalize image sizes to preserve aspect ratios
- Add data augmentation: noise, lighting variations, random artifacts
- Implement confidence calibration for better threshold selection
- Add post-processing heuristics to catch obvious false positives
Code
Both implementations are available on GitHub:
Related Posts
- A Review of Object Detection Architectures - Deep dive into YOLO and other detection architectures
- cv2 - OpenCV reference and tips